Add a GitHub repository to Semgrep Managed Scans
Add GitHub repositories to your Semgrep organization in bulk without adding or changing your existing CI workflows through Managed Scans.
Permissions
To add a repository, you must install the public Semgrep GitHub app and create and install a private Semgrep GitHub App.
- The public Semgrep GitHub app is required to easily add members of your GitHub org to your Semgrep org.
- The private Semgrep GitHub app is required to enable code access for Managed Scans.
If you haven't completed the installation of public and private Semgrep GitHub apps, Semgrep prompts you to do so when adding a repository.
See Pre-deployment checklist > Permissions for more information about the permissions used by Semgrep.
Add a repository
- In Semgrep AppSec Platform, click Projects.
- Click Scan new project > Semgrep Managed Scan.
- If you haven't completed the installation of public and private Semgrep GitHub apps, you are redirected to the Set up Managed Scans page, which facilitates the creation of both.
- Follow the steps in the page to create and register both a public and private Semgrep GitHub app.
- In the Enable Managed Scans for repos page, select the repositories you want to add to Semgrep Managed Scans.
- Optional: If you don't see the repository you want to add, click Can't find your project? and follow the troubleshooting steps provided.
- Select the repositories you want to scan from the list.
- Click Enable Managed Scans. The Enable Managed Scans dialog appears. By default, Semgrep runs both full and diff-aware scans.
- Optional: Disable PR or MR diff-aware scans by turning off the Enable PR/MR scans toggle.
- Click Enable.
- If you use the Semgrep Network Broker, you must edit your Broker configuration file; refer to Use Semgrep Network Broker with Managed Scans.
You have finished setting up a Semgrep managed scan.
- After enabling Managed Scans, Semgrep performs a full scan in batches on all the repositories.
- Once a repository has been added to Semgrep AppSec Platform, it becomes a project. A project in Semgrep AppSec Platform includes all the findings, history, and scan metadata of that repository.
- Projects with a Managed Scan configuration are tagged with
managed-scan, regardless of whether the project is actively being scanned by Semgrep Managed Scans or not.
Troubleshoot your Semgrep GitHub app installation
A complete installation is displayed in the Source Code Manager entry as follows:
 Figure. Semgrep AppSec Platform > Settings > Source Code Managers displaying a completed Managed Scans set-up.
You can also confirm a complete installation through your GitHub settings page, which should have two Semgrep apps:
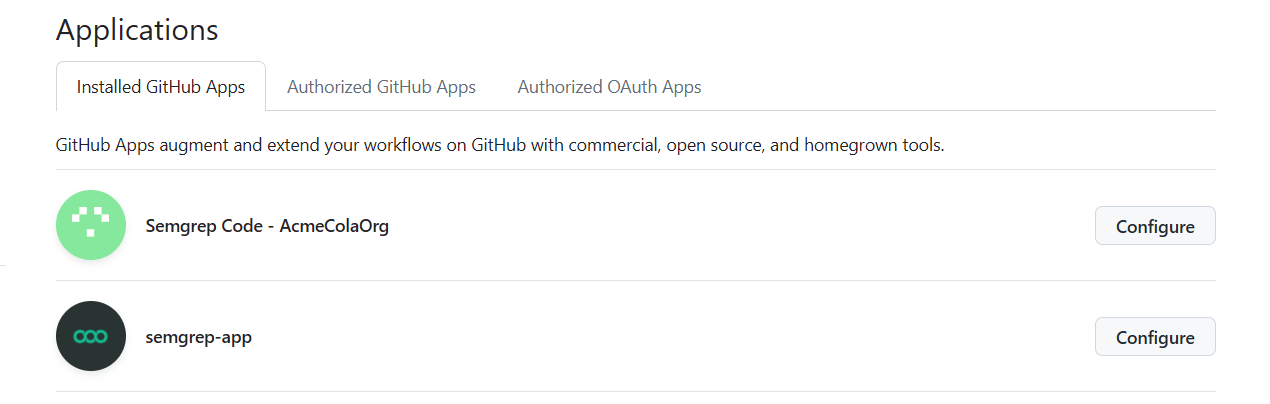 Figure. GitHub > Settings > Applications displaying both Semgrep apps. The private Semgrep app follows the convention Semgrep Code - YOUR_ORG_NAME.
If the page doesn't display any repositories
- Ensure you have provided access to both the private and public Semgrep GitHub to the repositories you want to scan by following the steps in Permissions and synchronicity.
- In Semgrep AppSec Platform, click Projects.
- If the page doesn't display the repository you want to add, click Can't find your project? > Sync projects.
- If the page doesn't display any repositories, click Sync projects.
- Optional: Perform a hard refresh (Ctrl+F5 or Cmd+Shift+R).
Repositories must be accessible to both the public Semgrep GitHub app and the private Semgrep GitHub app.
Convert or migrate an existing Semgrep CI job
You can immediately add any existing project to Managed Scans.
- Follow the steps in Add a repository.
- Delete the
/.github/workflows/semgrep.ymlfile in your GitHub repository if appropriate.
If you plan to continue running some scans in GitHub Actions (for example, using Managed Scans to run weekly full scans but GitHub Actions for diff-aware scans) you can leave the workflow file in place, and edit it to reflect your desired configuration.
Semgrep preserves your findings, scans, and triage history.
Scan management and configuration
Manually run a full scan
- In Semgrep AppSec Platform, click Projects.
- Search for your repository's name.
- Click the gear icon to access the settings page for that repository.
- Click Run a new scan.
Disable diff-aware scans on PRs
- In Semgrep AppSec Platform, click Projects.
- Search for your repository's name.
- Click the window icon under Details to access the settings page for that repository.
- Click the toggle for diff-aware scans.
Delete a project
- In Semgrep AppSec Platform, click Projects.
- Search for your repository's name.
- Click the window icon under Details to access the settings page for that repository.
- Click the dropdown at the header and click Delete project.
To delete an archived project:
- In Semgrep AppSec Platform, click Projects.
- Switch to the Not Scanning tab of the Projects page.
- Select the checkbox to Show archived projects.
- Search for the archived repository's name.
- Click the window icon under Details to access the settings page for that repository.
- Click the dropdown at the header and click Delete project.
Configure fail open to prevent diff-aware scans from blocking pull requests and merge requests
By default, diff-aware managed scans are set to fail open if a scan errors out or takes too long. This means that diff-aware scans are marked as successful on the pull request (PR) or merge request (MR), even if they haven't completed after the specified timeout, allowing you to make the Semgrep status check required in your source code manager (SCM) while not blocking someone from merging a PR or MR if the check encounters an unexpected issue or takes too long.
 Figure. Sample pull request showing the status of a diff-aware scan.
How fail open works
- If enabled, the fail open feature is triggered whenever you open a PR or MR.
- Initially, Semgrep sends an update to mark the PR or MR as
pending. - Once the diff-aware scan begins, the PR or MR is updated to a status of
running. - The diff-aware scan completes, and the PR or MR is updated to a status of
succeededorfailed. - If the diff-aware scan is in
pendingorrunningstatus longer than the configured timeout, then the fail open process updates the PR or MR to display a status ofsucceeded. This prevents the Semgrep scan from blocking the developer from merging their changes.
If Semgrep marks a PR or MR as succeeded, you can merge the PR or MR without waiting for the diff-aware scan to complete. However, if the PR or MR is still open and the scan completes after the fail open timeout is reached, Semgrep can still report the findings and mark the status as failed.
Configure fail open
By default, fail open is enabled. However, you can disable this feature and adjust the timeout value:
- Sign in to Semgrep AppSec Platform.
- Go to Settings > General > Managed Scans.
- Click the Fail open toggle to turn off this feature.
- Set the Timeout value in minutes. The default value is 10 minutes, the minimum value is 1 minute, and the maximum value is 60 minutes.
 Figure. Semgrep AppSec Platform settings page with fail open configuration options.
Revoke Semgrep's access to your repositories�
Remove the private app
The following steps revoke the code access you previously granted Semgrep for all repositories you selected.
- In Semgrep AppSec Platform, click Settings > Source Code Managers.
- On the entry of the SCM you want to remove, click Remove app.
- Click Remove to confirm.
Limit access to specific repositories
- Navigate to your GitHub settings page.
- On the entry of your private Semgrep GitHub app, click Configure.
- Under Repository access, de-select the repositories you no longer want to grant Semgrep access to.
Turn off Managed Scans for specific repositories in Semgrep AppSec Platform
- Sign in to Semgrep AppSec Platform.
- Go to Projects and find the project you no longer want scanned with Semgrep Managed Scanning. Click the project's Details page > Settings tab.
- Toggle the switch for Managed diff scans to turn off scans of new pull requests and merge requests and Managed full scans to turn off full scans of the base branch.

If your source code manager has Auto-scan enabled so that Semgrep automatically scans new repositories, turn off Managed Scans for specific repositories using Semgrep AppSec Platform. Do not turn off Managed Scans by deleting the repository from Semgrep AppSec Platform. If you have Auto-scan enabled and you delete your repository from the platform, Semgrep re-syncs the repository you deleted.
Appendices
Permissions and synchronicity
Both the public and private Semgrep GitHub app must have access to the repositories you want to scan.
To view the repositories you have granted access to:
- Navigate to your GitHub settings page.
- On the entry of your public Semgrep GitHub app, typically semgrep-app, Click Configure.
- Review the repositories under repository access.
- Perform steps 2 and 3 on the entry of your private Semgrep GitHub app.
Scan logs
Most recent scan
You can view logs for your most recent scan by clicking Projects > the project's latest scan time under Scan status.
It can take a few minutes for your latest scan's logs to appear. However, if the logs do not update 15 minutes after the scan, there may be issues with the scan itself.
All scans
- Click the project's Details page > Scans tab.
- Click the scroll icon under Logs to view the log for the particular entry.
Scan statistics
Scan statistics, such as how many of your repositories are being scanned, the scan success rate, and so on, can be provided once a week upon request. Contact your Semgrep account manager to request scan statistics.
Git Large File Storage
Semgrep Managed Scans skips files stored in Git Large File Storage (LFS). In general, Semgrep skips large files when scanning projects.
Not finding what you need in this doc? Ask questions in our Community Slack group, or see Support for other ways to get help.